Reviewed September 24, 2026 against source v1.7.41. Features and fixes are labeled by version. Check release availability.
Family-aware Windows driver setup
Receiver Setup identifies supported RTL-SDR, LimeSDR, and bladeRF hardware, shows the active Windows driver, and reports whether the installed runtime can open it. Driver requirements vary by family, so follow the detected-device status rather than applying one driver rule to every radio.
- Open ARRAY SETUP from the left drawer.
- Review the USB Driver Setup panel.
- Press INSTALL SDR DRIVER when a compatible interface is not using WinUSB.
- Approve Windows elevation, then allow the receiver service to restart and rescan.
Manual Zadig fallback
Use OPEN OFFICIAL ZADIG if automatic installation cannot bind a receiver. In Zadig, enable List All Devices, select the RTL2832U Interface 0 device, choose WinUSB, then install or replace the driver.
Array layouts
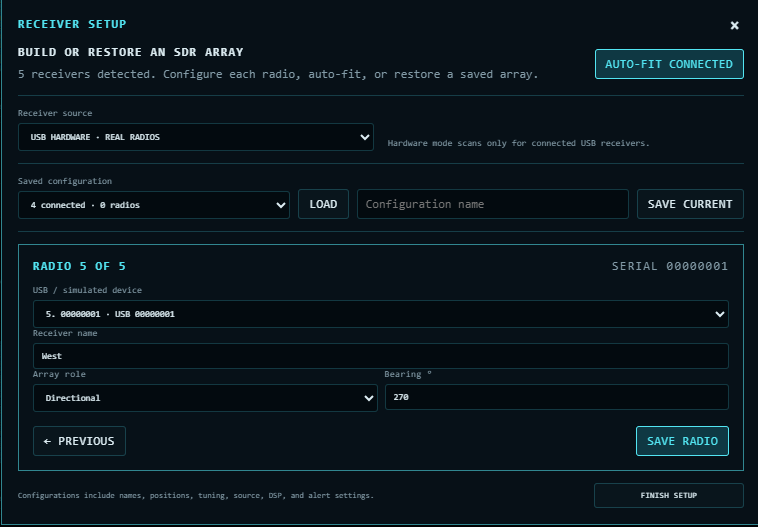
AUTO-FIT CONNECTED proposes a practical layout for the current receiver count.
| Receivers | Suggested layout |
|---|---|
| 2 | North / South |
| 3 | North / Southeast / Southwest |
| 4 | North / East / South / West |
| 5 | Four directions plus centre omnidirectional |
| 6 | Six-way ring |
| 7 | Six-way ring plus centre omnidirectional |
| 8 | Eight-way ring |
Stable receiver identity
Factory RTL-SDR serials such as 00000001 are shared by many dongles. With duplicate serials, a saved name can follow USB enumeration order rather than one physical radio. Keep each dongle's hardware serial unique for a dependable array.
Give a factory-serial RTL dongle its own identity (v1.7.39+)
- Identify the intended dongle. If you cannot distinguish identical units, connect and configure one at a time.
- Select it, open IDENTITY, and choose GIVE UNIQUE SERIAL. The option is for supported local, non-simulated factory-serial RTL devices, not tinySA, remote rtl_tcp, or every radio family.
- Use the suggested unused serial or enter 1 to 14 letters, digits, underscores, or hyphens. Choose a different value for every dongle.
- Save and wait for the app to verify the EEPROM write. Do not unplug or interrupt power during the write.
- After success, unplug and replug the dongle as prompted. Confirm its name, antenna, bearing, and saved settings follow the physical receiver.
The operation changes the serial descriptor and preserves manufacturer and product descriptors, including the product identity used by RTL-SDR Blog V4. It is a persistent hardware change, not merely a display nickname. A failed verification must be treated as a failed write, not success.
On older versions, an experienced operator can use the external rtl_eeprom utility with only the intended dongle attached. Prefer the application's guided, verified workflow where available. See version availability.
Name a newly connected receiver
From v1.7.39, a previously unconfigured receiver connected after setup opens a dialog for its name, antenna role, and bearing. A supported factory-serial RTL dongle also offers a unique serial. Choose LATER to use the IDENTITY drawer afterward. While Array Setup is open, the wizard handles naming instead of opening a competing dialog.
USB power and bandwidth
- Use a powered USB 3 hub for larger arrays.
- Split receivers across independent USB controllers when practical.
- Use matched antennas and feed lines for meaningful amplitude comparison.
- Test unplug, replug, and restart behavior before field deployment.
Sequential hot-plug setup
For several identical radios, connect and configure one receiver at a time. Name it, assign its slot and antenna role, save it, then connect the next radio. The wizard preserves stable order and existing metadata while each new receiver is identified.
- Disconnect the unconfigured receivers.
- Connect the first radio and wait for it to appear.
- Assign a unique name, slot, role, and bearing, then save.
- Connect the next radio and repeat until the array is complete.
- Select FINISH only after the final deduplicated roster is visible.