Reviewed September 24, 2026 against source v1.7.41. Features and fixes are labeled by version. Check release availability.
Build the array map
Open ARRAY SETUP from the left drawer, press AUTO-FIT CONNECTED, then assign every receiver a persistent name, slot, antenna role, and bearing. Save the configuration when the physical layout is complete.
| Receivers | Auto-fit layout |
|---|---|
| 2 | North / South |
| 3 | North / Southeast / Southwest |
| 4 | North / East / South / West |
| 5 | Four directions plus centre omnidirectional |
| 6 | Six-way ring |
| 7 | Six-way ring plus centre omnidirectional |
| 8 | Eight-way ring |
Antenna roles and bearings
- Directional: points toward its configured bearing and contributes directional amplitude evidence.
- Omnidirectional: provides a broad reference channel.
- Vertical reference: provides a reference for vertically polarized signals.
Use matched antennas, feed lines, gains, and comparable placement when interpreting amplitude relationships.
Rosebud display
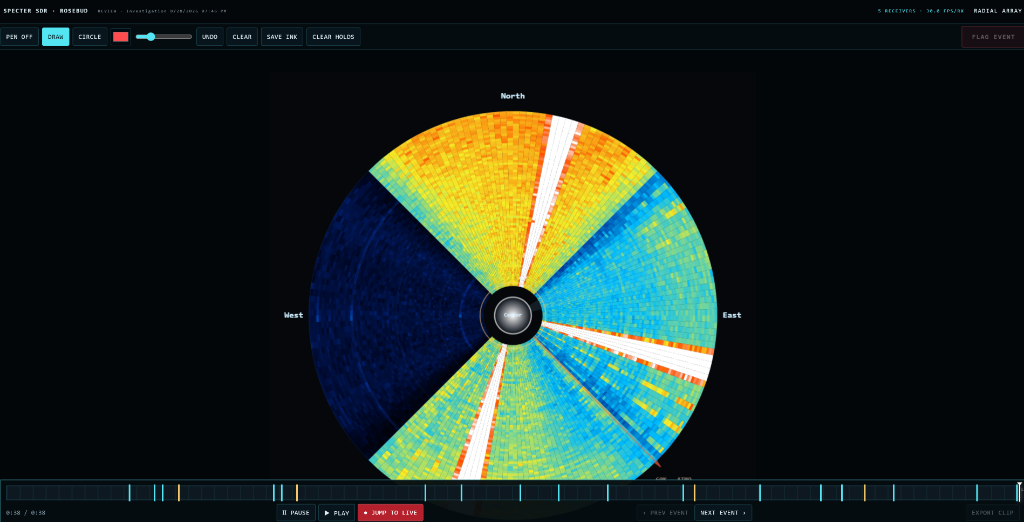
Press ROSEBUD to open the radial array in a separate window or route it to a second monitor. Multi-radio arrays show comparative amplitude, inferred bearing, movement, and confidence. A single-radio setup renders a full 360-degree waterfall rather than an empty array hub.
Focus and aggregate handoff
Double-click any receiver canvas to enter focus mode. In the aggregate full-speed spectrum, click a frequency to focus the receiver assigned to that slice.
Annotation
Press P, or use the toolbar, to enter pen mode. Draw freehand marks or circle regions with touch, stylus, or mouse. Undo and clear are available from the toolbar, and annotations are captured in recordings. PNG export preserves the current annotated view.
Improve bearing quality
- Calibrate PPM against a known reference.
- Keep gain settings and antenna systems consistent.
- Confirm every bearing matches the physical placement.
- Use array-linked tuning when comparing the same signal across receivers.
- Treat bearing as comparative evidence, not a precision geolocation measurement.
Keep physical receiver identity stable (v1.7.39+)
A nickname alone cannot distinguish two RTL dongles with the same factory serial. The new-receiver dialog and IDENTITY > GIVE UNIQUE SERIAL provide a verified hardware-serial workflow for supported local RTL devices. Unplug/replug only after success, then check each antenna and bearing against the physical receiver. Read the identity procedure.
In v1.7.41, radios appear above analyzers regardless of their slots. That visual ordering does not change array roles, bearings, or scan partitions. Keep a channel-watch radio free from scan assignments if it must remain on one frequency.